There are many cases where Microsoft Windows users complain about their Windows 10 not able to show some compatibility. This computability issue harnesses the quality of the performance while taking up 50% of the system’s PC. If you are dealing with the same issue which has resulted in the compatibility telemetry high disk & CPU usage with the Microsoft Windows, we can help you with that as we have added all the guidelines to help you out. We are saying this because we have added How To Fix Windows 10 Microsoft Compatibility Telemetry High Disk Usage in this article. At the end of this article, we are sure that you will be able to solve the issue!
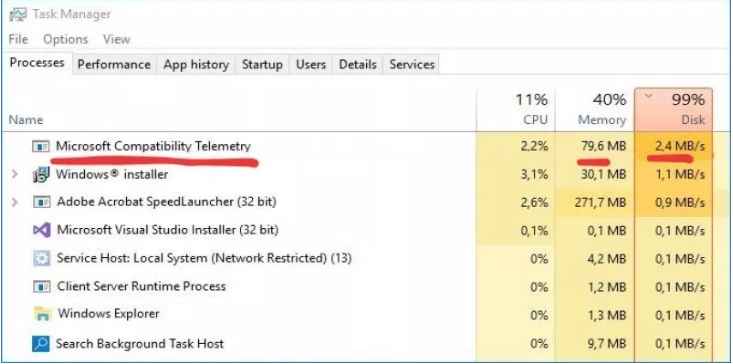
However, before we jump off to the solutions, let’s get you a little background about the Microsoft Compatibility telemetry and why it creates various problems including CPU, High Disk, and memory usage issues. When it comes to the Windows 10, Windows compatibility telemetry is the most important process as it collects data related to the performance of a Windows device and about the performance of different software.
The data that is collected over this period is used to analyze and improve things to increase the level of user experience. It helps the developers to solve the bugs and fix the errors in the respective Windows 10 computers. Windows 10 is famous for their amazing customer support service which shows that the problem is resolved as soon as they are notified. When the data is collected from a large number of Windows 10 users, the developers at the back end sit together to analyze everything and they design the new updates accordingly. This is the reason that with each new update, everything is made better.
So, there is recently an issue known as Microsoft compatibility telemetry high disk usage issue for the Windows 10 which has also been given the name of compattelrunner.exe. So, now let’s see how it can be solved!
How To Disable Microsoft Compatibility Telemetry
Whenever a problem pops up, there is always a solution for it and same is the case with Microsoft compatibility telemetry. We have added the solutions with proper guidelines in the section below!
- In the first step, press the Windows + R to open the dialogue box
- Once the dialogue box is opened, type “gpedit.msc” and tap the OK button
- As soon as you hit the OK button, it will launch the group policy editor and from there, you can browse through the computer configuration
- Then, opt for the administrative templates, then the windows components, and lastly, go to the data collection and preview build
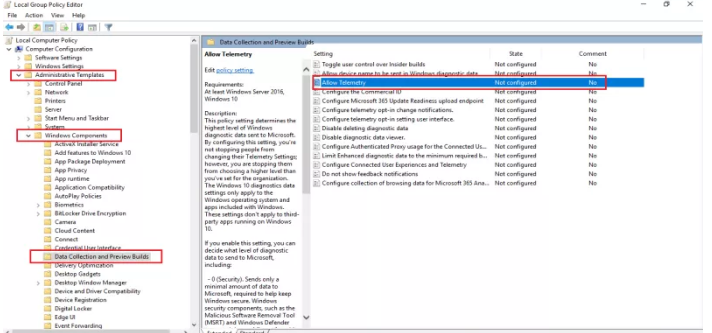
5. Now, double click on the “Allow Telemetry” and from there, disable it and click on the OK button
Once it is all done, launch the task manager on your computer system and check if the problem has been resolved. If it has been resolved, great but if it is not, we have got another solution for you!
How To Turn Off Microsoft Compatibility Telemetry Through Registry Editor
This is an alternative issue and there are high chances that it will resolve the issues. So, follow these steps and get rid of the Microsoft Compatibility Telemetry easily and without any hassle;
- In this first step, press the Windows + R keys to launch the dialogue box
- As soon as it is launched, type in “regedit” and click on the “OK” button
- Now, follow the HKEY_LOCAL_MACHINE > SOFTWARE > Policies > Microsoft > Windows > DataCollection path
- Right-click on the “DataCollection” to add a new value
- When it opens up, type “DWORD(32-bit)
- A new file will be created and as soon as it is created, set the value to zero
After this, press the “Ctrl + Shift + Esc” keys altogether to launch the task manager. You can check from here if the issue has been resolved or not. If the issue is still there, you can opt for the third method that we have added in the section below;
How To Disable Microsoft Compatibility Telemetry Through CMD
If none of the above two mentioned solutions and processes worked for you, you can get help from the command prompt to solve the issue. We have added the guideline, so, follow them and get rid of the Microsoft Compatibility Telemetry;
- Press the Windows key and the menu will pop up
- Then, type in the command prompt, right-click on it to launch it as admin
- Once the window is launched, type in the following commands and enter;
sc delete DiagTrack sc delete dmwappushservice echo “” >
C:\\ProgramData\\Microsoft\\Diagnosis\\ETLLogs\\AutoLogger\\AutoLogger-Diagtrack-Listener.etl reg add
“HKLM\\SOFTWARE\\Policies\\Microsoft\\Windows\\DataCollection” /v AllowTelemetry /t REG_DWORD /d 0 /f
This was all about How To Fix Windows 10 Microsoft Compatibility Telemetry High Disk Usage and we hope that it helped you solve the problem. If you need any more help, leave a comment in the comment section below and our team shall get back to you for helping out. If it helped out, share it with your tech-savvy friends and colleagues and help us grow. Thank you!